When we chose our latest place to live, we decided to give priority to inside the house and less concern for the backyard. Not only is our backyard small, but a large patio covers up a big portion of the grass, leaving an awkwardly-sized space that isn’t good for much of anything. I guess we could put a swing set for our son, but with parks all over I think it’s better to go out for that type of activity.
At first, we thought of just leaving it alone. That worked great until the summer rolled around, after which the grass started growing pretty quickly. Not wanting to buy a lawnmower or spend the time mowing such a small area, we struggled thinking of ways to make the best use of it. The maintenance extends to more than just mowing since it seems that fertilizer is also needed to keep it green year round. I have seen people spend a good amount of time maintaining their lawn and still run into issues with keeping it healthy.
Since you probably read the title of this post, I’m sure you can guess where this is leading. That’s right, one of us mentioned the idea of making a Japanese-style rock garden, half in jest, and the more we thought about it the nicer it sounded. In Japanese, this is traditionally called karesansui (written as 枯山水 using the letters for ‘dry’, ‘mountain’, and ‘water’), and you can see them in Japanese temples. For example, the famous Ryōan-ji boasts a beautiful Zen garden (also called ‘dry landscape’) that was said to be built in the late 15th century. There is a lot of history and thought put into those gardens–they are considered by some as places of meditation–but one of the key points is that the many fine-grained rocks represent the ocean.
However, as our interest in this idea grew, so did our concern about the cost. Without a doubt, making an authentic Japanese rock garden, even on a small scale, seemed way above our budget. But we still wanted an official estimate, so after doing a little searching we called a landscaper who seemed to have pretty good reviews and reasonably-looking gardens on his website (although there wasn’t actually any pictures of Japanese rock gardens).
After about an hour of chatting with him, he gave us an extremely rough estimate of $10,000, although that was to be refined after we went through the design stage, which (of course) required a separate set of meetings and associated cost. Also, from talking to him we got the feeling he didn’t know that much about Japanese rock gardens. The combination of his lack of specialization, cost, uncertainty, and (to be honest) attitude made it an easy decision to not pursue things further with him.
So we got a bunch of books from the library, spent some quality time with Google, and even visited a few places that sold landscaping materials such as gravel and large rocks. In theory, for a simple rock garden (and I mean just rocks) the materials shouldn’t be that expensive. In fact, a basic calculation using a type of pebble we liked ran up to only a few hundred for the rock cost.
So we started ripping up the grass with our own bare hands and shovels, but after some time had passed we realized we only had done a small percent of the total area. Despite the relatively tiny area involved, our lack of experience (and possibly strength) was making the first step of “self-taught rock gardener” quite a challenge. We also found out that one of the suppliers that quoted a good price for the gravel would only deliver it to our front yard, and for insurance reasons they were not able to carry it back to where the garden would be. This represented a significant amount of extra work for us if we wanted to do it on our own.
Around that time, we asked a friend who happened to know someone working at a Japanese-owned landscape company that specialized in these types of gardens. We spoke over email and they said someone from their company would drop by to speak with us within the week to discuss an estimate and what our options were.
The man who came was an older Japanese man and we spoke to him for over an hour, purely in Japanese. When we first mentioned we were thinking about having a fountain in one corner, the resultant price estimate was way over our budget (the $10k mentioned above for the other company’s estimate did not include a fountain, by the way). We gave him a rough idea of the most we wanted to spend, and he said that might be possible, however we would have to keep it extremely simple: rocks and a few trees. We then expressed a desire to have a little footpath, and he said that might be feasible as long as we kept that simple as well, a path comprised of a few larger rocks within the smaller gravel that was the base of the rock garden. There is normally a process and cost associated with the design stage, but rather than go with those formalities he sketched out a basic design on paper right there on the spot, with a curved border (edging) that snaked around in the available space.
As we spoke, this “gardener” seemed to know a great deal off the top of his head, including information about materials and cost, without a need to glance at reference materials. A few times during our meeting he offhandedly mentioned he had worked on certain major Japanese gardens, which was a big surprise to us.
Eventually, he offered to measure the dimensions of our backyard himself, another surprise since the other company required the measurement be done in a separate session (for a fee). In only a few minutes he presented us with a rough cost estimate, but he promised to try to get things complete for that price. While a bit higher than I wanted originally, we felt it was reasonable, especially given the company he was from specializes in Japanese gardens. We agreed to go to the next step and have him send us a detailed proposal.
When he left, we did some more research and found out he was actually the owner and had in fact participated in the design and/or construction of several public Japanese gardens. In light of this, the number he had quoted seemed an amazing deal.
In under a week he sent a proposal which was roughly in line with our initial discussion and contained an itemized list with prices. We agreed to go forward and did partial payment.
In only a few weeks (slightly ahead of schedule) the construction began. The bulk of the actual hard labor was done with the help of two younger guys working several hours a day for most of the week. I’d guess roughly 20 hours for each person, total. Even though we adopted relatively a simple design, it was still a proper Japanese rock garden as opposed to just pouring in a bunch of rocks on top of the grass. Here is a basic outline of the steps, based on our observations of the work.
- Remove the grass to expose dirt. Dispose of it properly.
- Lay down filter cloth to prevent weed growth. Draw outline of the garden shape with a marker.
- Install edging (dividers). These use little pieces of wood to help keep them in place.
- Lay down larger stones (basalt) for the footpath. Once layout is confirmed, put sand under the base of each to hold them in place
- Place planting soil on outside areas, smooth out.
- Place gravel inside, smooth out flat. These were technically called [5/8″ white granite chips] on the materials manifest, but in actuality they are a spotted mix of white, grey, and black. We initially thought that small, rounded rocks would be best, but were told those can get slippery, so it’s best to go with the irregularly shaped ones.
- Plant trees and bushes in the dirt area. There was one plant in the main gravel area as well (at first I thought this was a mistake, but he told me was purposefully done to offset the balance), around its roots be sure to add a little dirt. Use a hose to get enough water to the plants’ roots.
- Lay down other stones in outside dirt area. All stones are submerged to a certain extent, especially the ones that jut up vertically. The edging was laid out to leave holes for a few of the bigger stones so it looks like the edging passes right through them, adding to the effect of them being submerged in water.
- Water down all rocks with a hose (I think this was done to clean them of dirt).
- Final cleanup of all trash (including old grass which must be properly disposed of), cleanup of side walkway to reduce rocks there.
(Note: the sprinkler system was kept intact, though we initially considered removing it)
The Japanese landscaping company’s owner, who had stopped by a few times during the work to observe and adjust things, came back the day after the work had finished. He answered all of our questions and gave us some details about the garden design (like how the larger rocks are supposed to represent 険しい山 or ‘dangerous mountains’). One of our biggest concerns was maintenance, as reducing time maintaining our backyard was one of the reasons for the rock garden in the first place. He said that maintenance was very minimal, consisting of mostly trimming the plants (once a year should be fine) and removing leaves and other stuff that happen to land in the garden. He also said we can buy a special type of rake in order to make the wavy patterns as they do at the public Japanese gardens. After having done a little bit of minor maintenance a few days later, I realized that maintenance of this garden is much more rewarding than a square field of half-dead grass.
He said that we can always add things later on our own (like a fountain or more plants), though to be honest, we were so satisfied with the work, I don’t think we will be doing much more, at least for a little while.
The other day I learned of the word めぐり合わせ (meguriawase) which is a bit tricky to translate, but I would say fate is one way to express it in English. Although the garden was not cheap by any standards, we feel it was money very well spent and are thankful for the meguriawase that resulted in a chain of events leading to this amazing result. An important part of this experience was being able to speak to the master gardener in Japanese (as well as understand him) during the initial planning and sign-off stages, and I learned much from that. Had I not known Japanese, I believe my interactions with him would not have been nearly as deep.
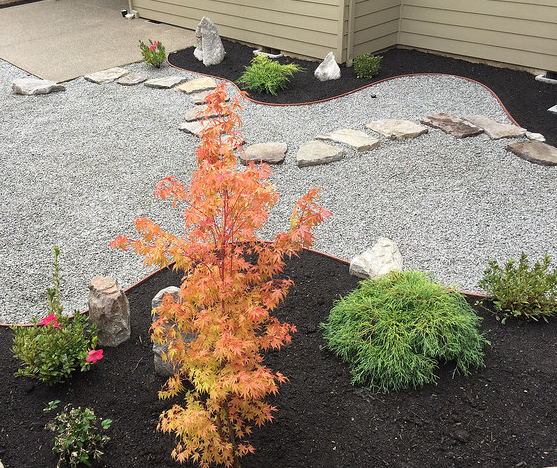
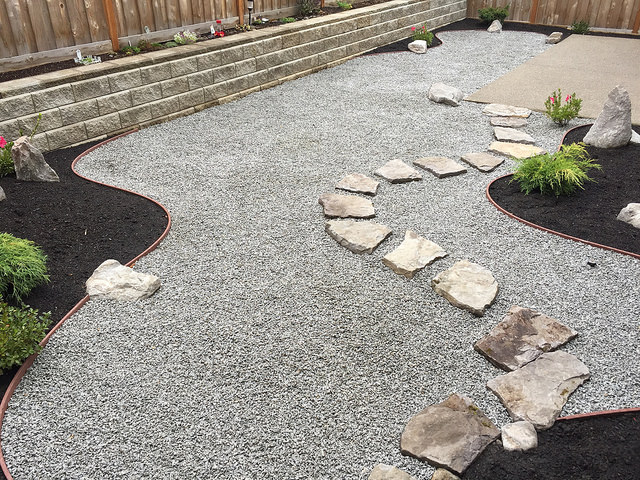
We still have some minor things to tweak, but I went ahead and took a few pictures right after we did the sign-off with the owner. You can see them at the bottom of this article. The first one shows the garden from a slightly raised location, but I don’t think it gives you a good sense of space or atmosphere. I like the second shot more, which is taken from a lower angle.
As a final note, for those who want to save money and make your own karesansui garden yourself, I think it can be done and encourage those who want to attempt it. The list of steps I gave above will give you a head start. Just be prepared for some hard labor and make sure you properly research your materials. One thing that we were told was that materials at a random store are often low quality and, at least for some items (like a fountain), may not last more than a year. Even for plants, the materials used by the company we chose have a one year guarantee and are of higher quality than typical plants you buy at someplace like Home Depot. But in exchange, you can typically pay three times the cost for the quality. Even for the gravel, one of the most important materials, I don’t think we saw the exact type at any of the nearby landscaping supply stores, so you may have to do some digging (no pun intended) to find that. (Whatever you do, do not buy the colored gravel! It’s 安っぽい which roughly means ‘cheap-looking’.) Even the larger rocks, which you might think are easy to acquire, can be pretty costly, and I was impressed by how he found many similarly-shaped rocks (listed as ‘hand selected’ on the manifest) that fit just perfectly into a meandering footpath. I hope (and expect) the extra care he took will translate into this garden lasting for many years, if not decades.
During the sign-off, we talked about some of the fine details including names of the plants and the karesansui garden’s construction. But the gardener emphasized that those types of details really don’t matter too much. The important thing is whether we are satisfied with the end result, whether viewing it brings us joy. We could only respond with a resounding yes.

I really love to see new Japanese gardens to be built 🙂
I am a gardener and garden designer working in Tokyo and writing guide books about japanese gardens.
Actually the next eBook I will publish is about stone arrangements.
What a coincidence that a blogger I follow now built a Japanese rock garden at home!
Actually, the way your gardener worked is very Japanese. We are doing the same here, although I am still not able to do an estimate on spot. But of course my boss is ^_-
The way how your gardener set the stones is really good, also with breaking the edging.
I think with a low budget, he really did a good job.
However, for balance, the rocks could have been a little bit bigger ^_-
And the gravel he used is top!
Thanks very much for the comment. Glad to hear a third-party (expert) evaulate my gardener’s work as top quality (:
Regarding the rock size, we had made some requests to him (not detailed in this post) which is probably why they ended up like that.
Good luck with your eBook!
By the way, if you are interested in me reviewing it, maybe you can send me a copy once it is out (:
My email address is selftaughtjapanese [at) gmail.com
Thank you!
I will be sending over a copy as soon as it is ready.
However, I hope you won’t find too many mistakes in my English xD
Large rocks are also always expensive. I think scaling down is a good way to keep costs at an average level.
These pictures are awesome. The garden looks great!
I noticed in the steps you listed that towards the end they did some hosing down – is that something that you will have to do as part of maintenance or is it a one-off or does rain do the job from here on out or…what exactly?!
Congratulations, this rock garden is hella sweet.
I think the hosing-off at the end was just to get it looking its best for final inspection.
Generally, any fine dirt should be taken care of by rain, and we also kept our sprinklers still running on a timer which will further clean things up.
I don’t think we will have to do any periodic hosing, although once in a while there may be circumstances that warrant it.
The hosing down of the stones is indeed to clean them. Light dirt will be washed off by rain, but normally during the construction works heavier dirt will be at the stones and you wash it off by hand.
Also, you want to give the garden to the owner looking clean and from it’s best side. So of course you are getting rid of all the dirt 😉
Another reason could be, to make sure the rocks are really sitting solid in the ground. When you hose down and there is loose soil under them, they would move and you need to fix it.
Plants should also always watered after planting.
I have been fighting with grass myself a lot lately, and something like this seems like a great solution if you’re willing to take on the project. The final result turned out amazing! Thanks for including the pictures.
I visited Ryōan-ji before, and it was fun to look at the garden from lots of different angles. I really like that you have a footpath, so you can enjoy the garden from the inside as well as the outside.
Yeah, I’d rather spend the time mowing my lawn on doing translations and reading novels instead (:
The path is really great, not only does it allow you to view things for different angles, as you say, but it also acts as the focal point for the garden, something to draw the eye and lead it.
Originally I was thinking to just pour down a bunch of rocks, and in fact there are rock gardens which don’t have a path through them, but with an area of this small of a size I think it would be somewhat bland to have done that here.